Tinyproxy – The Ultimate Guide (with Scrapeless Proxies Recommendation)
Expert Network Defense Engineer
Take a Quick Look
Boost your automation and scraping with Scrapeless Proxies — fast, reliable, and affordable.
As someone who has configured several proxy servers, I can say that Tinyproxy is a lightweight and efficient solution for your proxy needs. Whether you want to improve your online privacy, manage internet access, or handle small-scale automation, Tinyproxy is an excellent choice.
This guide takes you step-by-step through setting up, configuring, using, and troubleshooting Tinyproxy, along with a robust alternative for advanced users: Scrapeless Proxies.
1. What is Tinyproxy?
Tinyproxy is a small, fast, and versatile HTTP/HTTPS proxy server. Unlike full-featured proxy servers, Tinyproxy is lightweight, uses minimal system resources, and is ideal for embedded devices or small servers. It’s perfect for users who need basic proxy functionality without extra overhead.
2. Tinyproxy Pros and Cons
| Pros | Cons |
|---|---|
| Lightweight and minimal resource usage | Limited features compared to more advanced proxies |
| High performance for small-scale tasks | Basic access control |
| HTTPS support | Basic logging |
| Open-source and free | Small support community |
| Quick setup | No caching or advanced filtering |
| Customizable | Not suitable for large networks |
3. How to Install Tinyproxy
- Update your package list:
bash
sudo apt update- Install Tinyproxy:
bash
sudo apt install tinyproxy- Start the service:
bash
sudo systemctl start tinyproxy- Enable Tinyproxy at boot:
bash
sudo systemctl enable tinyproxy4. How to Configure Tinyproxy
The configuration file tinyproxy.conf is located at /etc/tinyproxy/.
a. Basic Configuration
- Set the port: Default is
8888. - Allow specific IP addresses:
text
Allow 192.168.1.0/24- Configure logging:
text
LogFile "/var/log/tinyproxy/tinyproxy.log"
LogLevel Info- Max clients:
text
MaxClients 100- Timeout:
text
Timeout 600- HTTPS support:
text
ConnectPort 443- Anonymous mode:
text
Anonymous "headers"- Basic authentication:
text
BasicAuth username:passwordSave changes and restart:
bash
sudo systemctl restart tinyproxyb. Advanced Configuration
- Content filtering: Use the
Filterdirective to block URLs. - Bandwidth control: Integrate with Linux
tcor other network tools.
5. How to Set Up a Browser to Use Tinyproxy
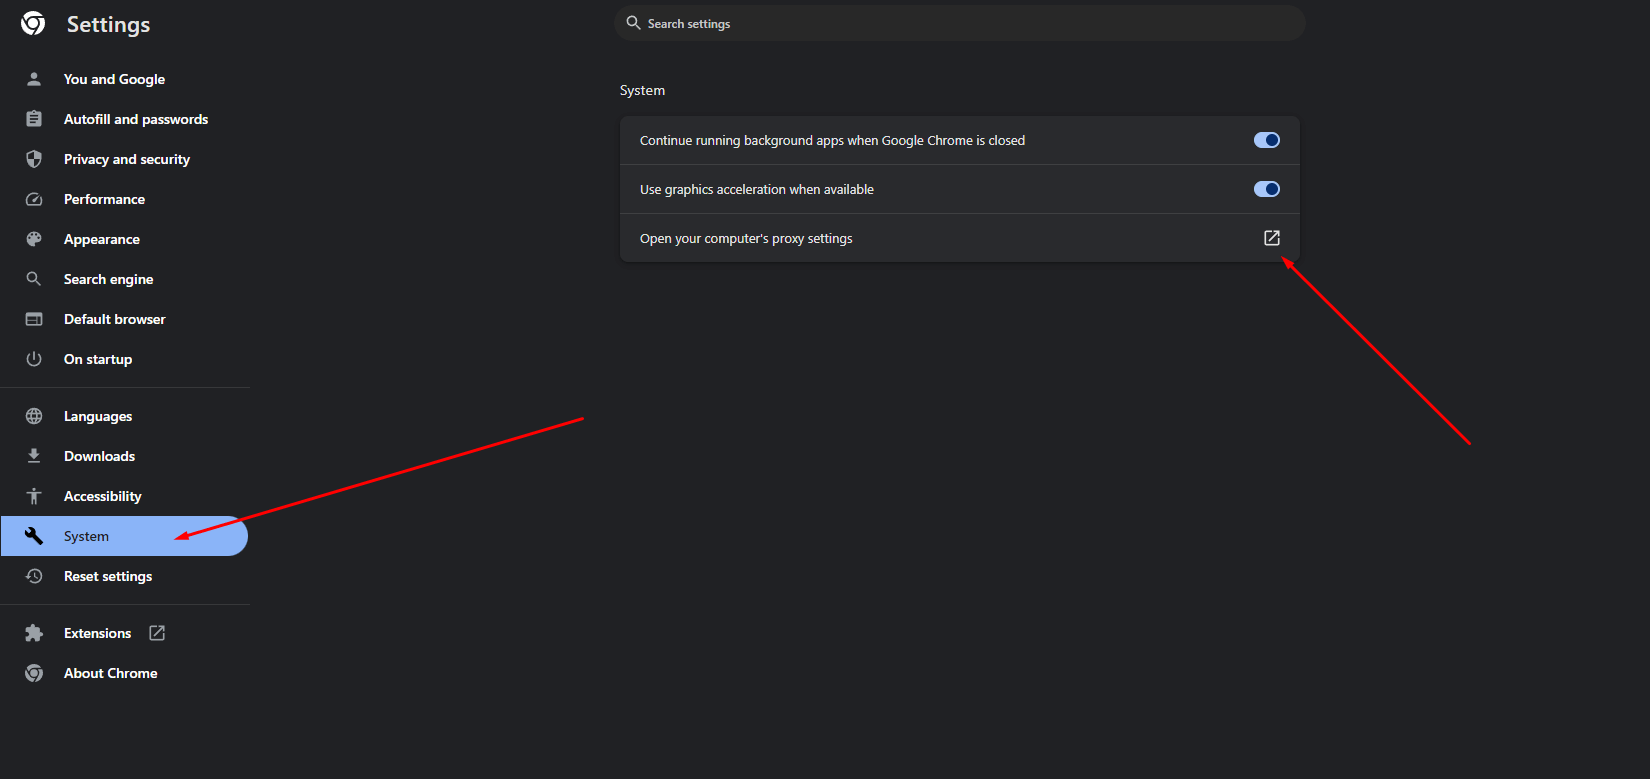
Google Chrome
- Settings → System → Open Proxy Settings → LAN Settings → Enter Tinyproxy IP and port
Firefox
- Options → Network Settings → Manual proxy → Enter IP and port → Apply
Edge
- Settings → System and Performance → Open Proxy Settings → LAN Settings → Enter IP and port
Safari
- System Preferences → Network → Advanced → Proxies → Enter IP and port
6. How to Set Up a Mobile Device
Android
- Wi-Fi → Modify Network → Advanced options → Proxy → Manual → Enter IP and port
iOS
- Wi-Fi → Tap network → HTTP Proxy → Manual → Enter IP and port
7. How to Test Your Proxy Configuration
- Check your IP at WhatIsMyIP.com
- Try accessing restricted sites
- Check logs:
bash
sudo tail -f /var/log/tinyproxy/tinyproxy.log8. Optional Alternative: Scrapeless Proxies
For users who need more advanced features, automation, or high-volume tasks, Scrapeless Proxies is an excellent complement to Tinyproxy. It offers:
- High-speed connections for browsing and scraping
- Automatic IP rotation to prevent bans
- Geo-targeting for location-specific tasks
- Seamless integration with automation tools
This makes Scrapeless Proxies ideal for:
- Social media automation
- Large-scale web scraping
- Multi-account management
- Enhanced privacy and security
Tip: You can use Tinyproxy for lightweight tasks and testing, while leveraging Scrapeless Proxies for more demanding automation and large-scale workflows.
9. How to Use Scrapeless Proxies
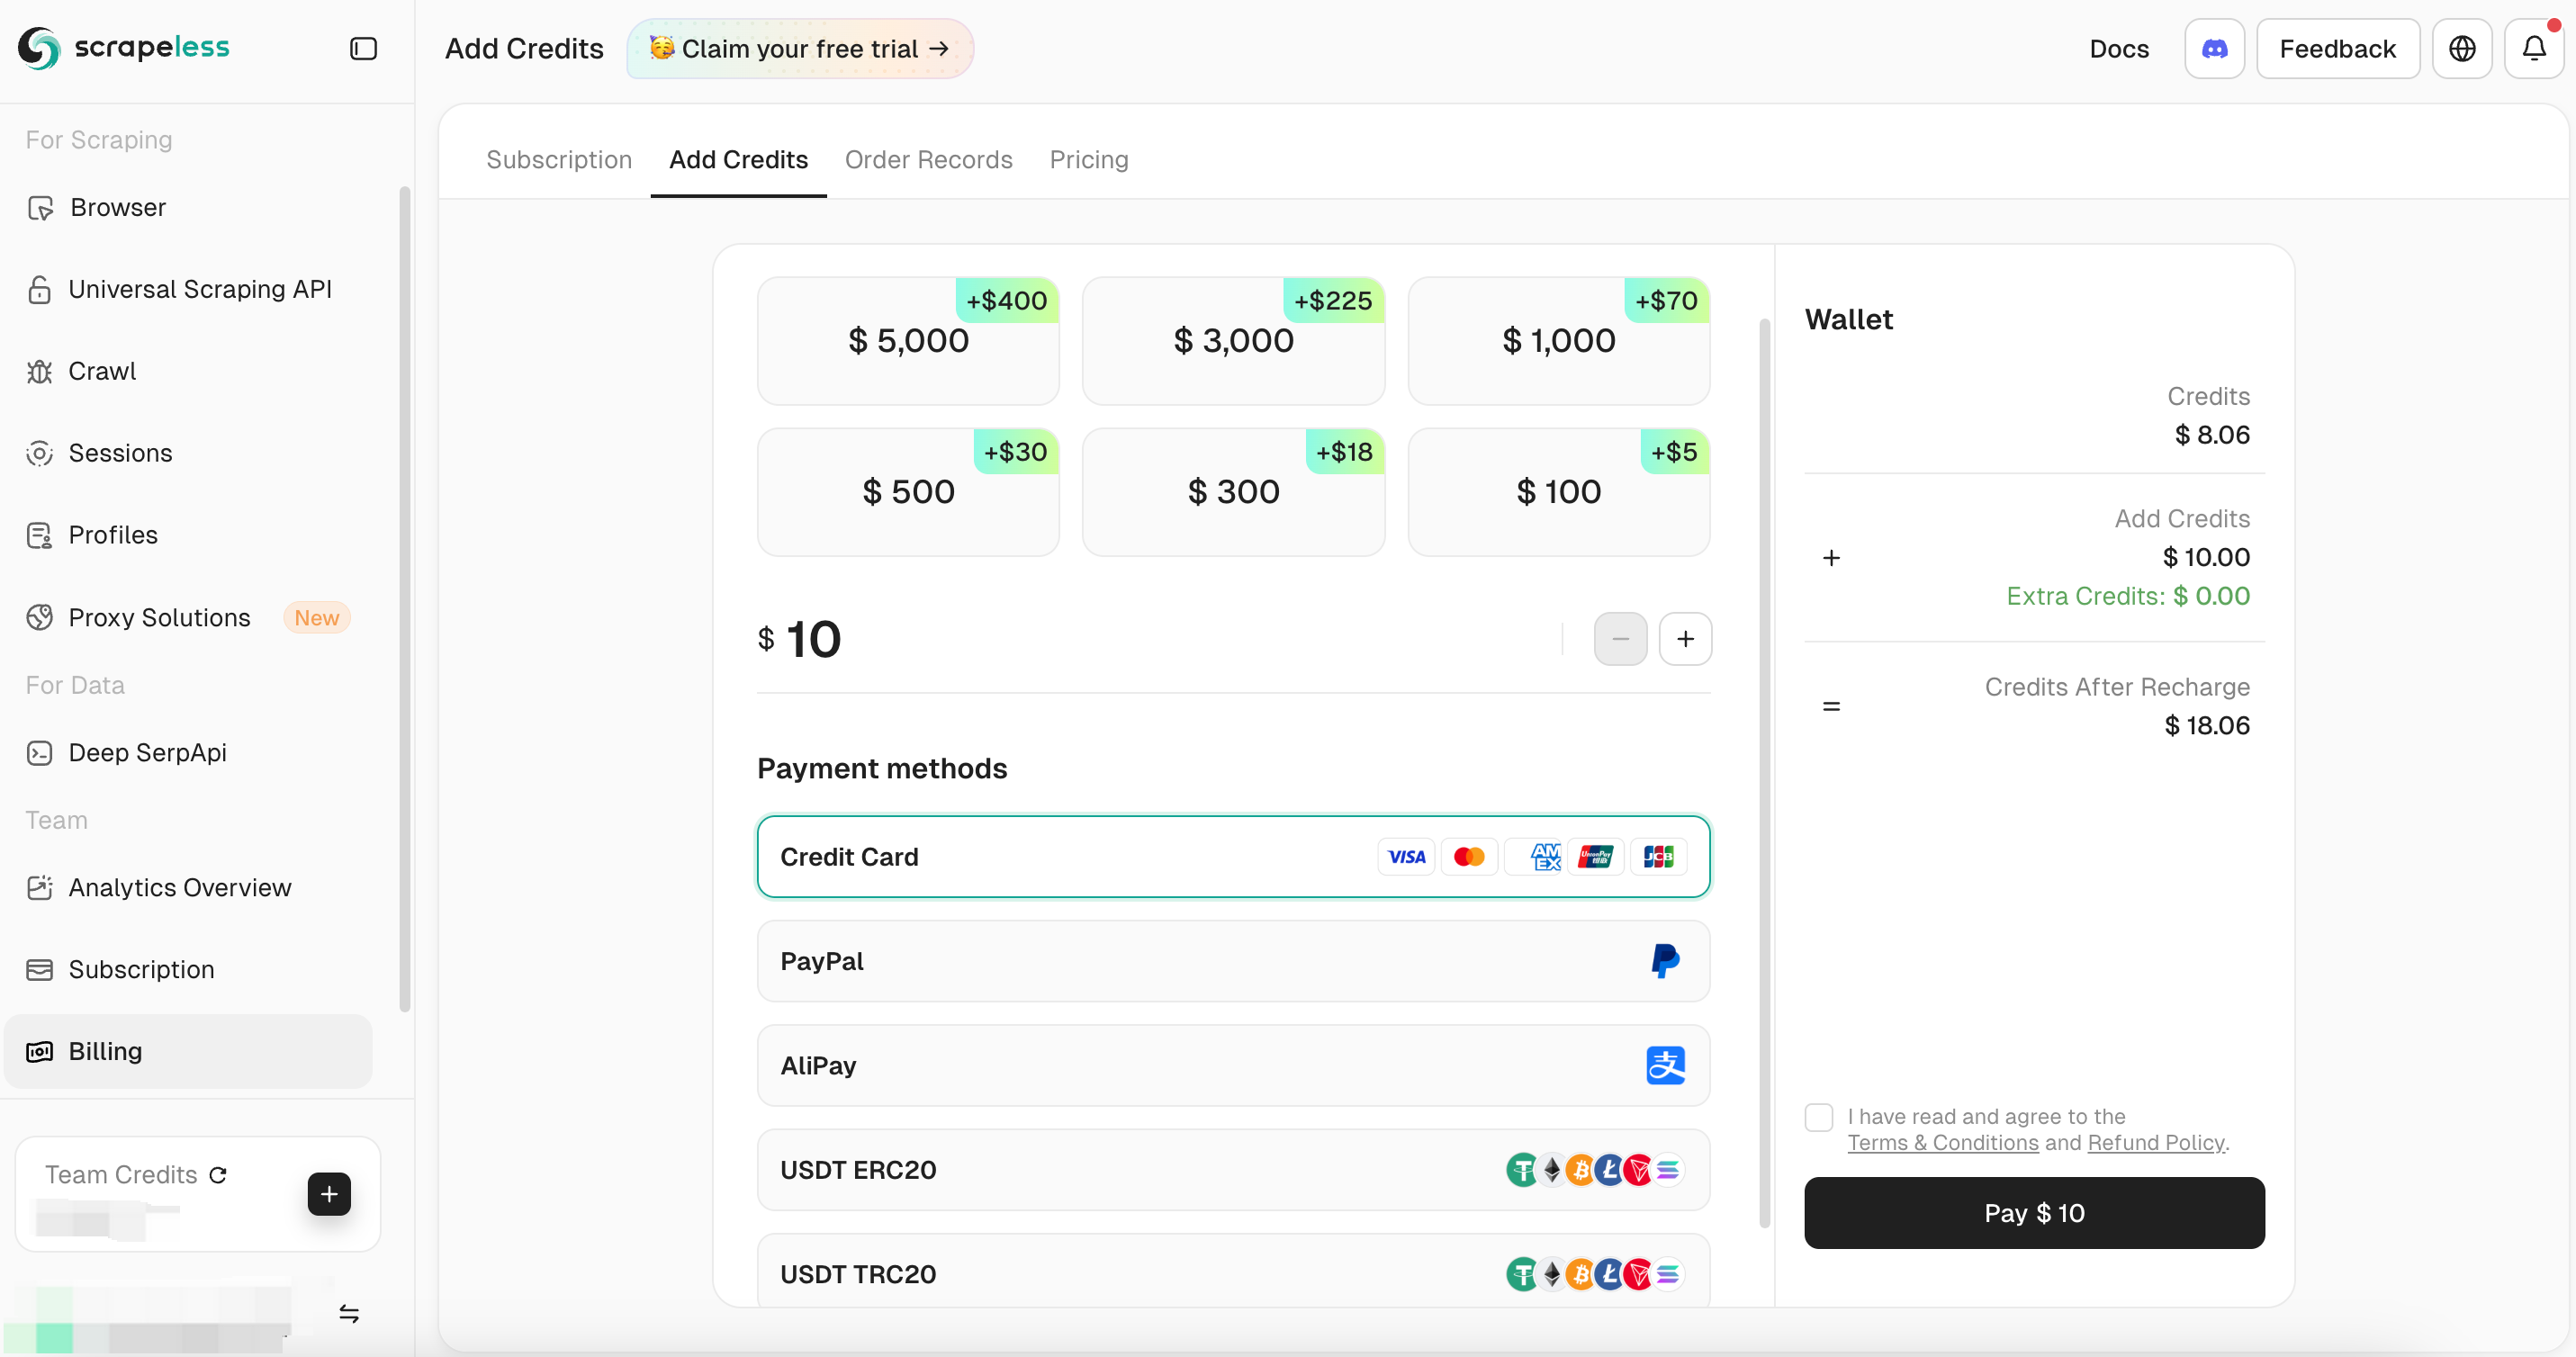
Click Sign Up and log in to access the Scrapeless Dashboard.
Top Up Wallet
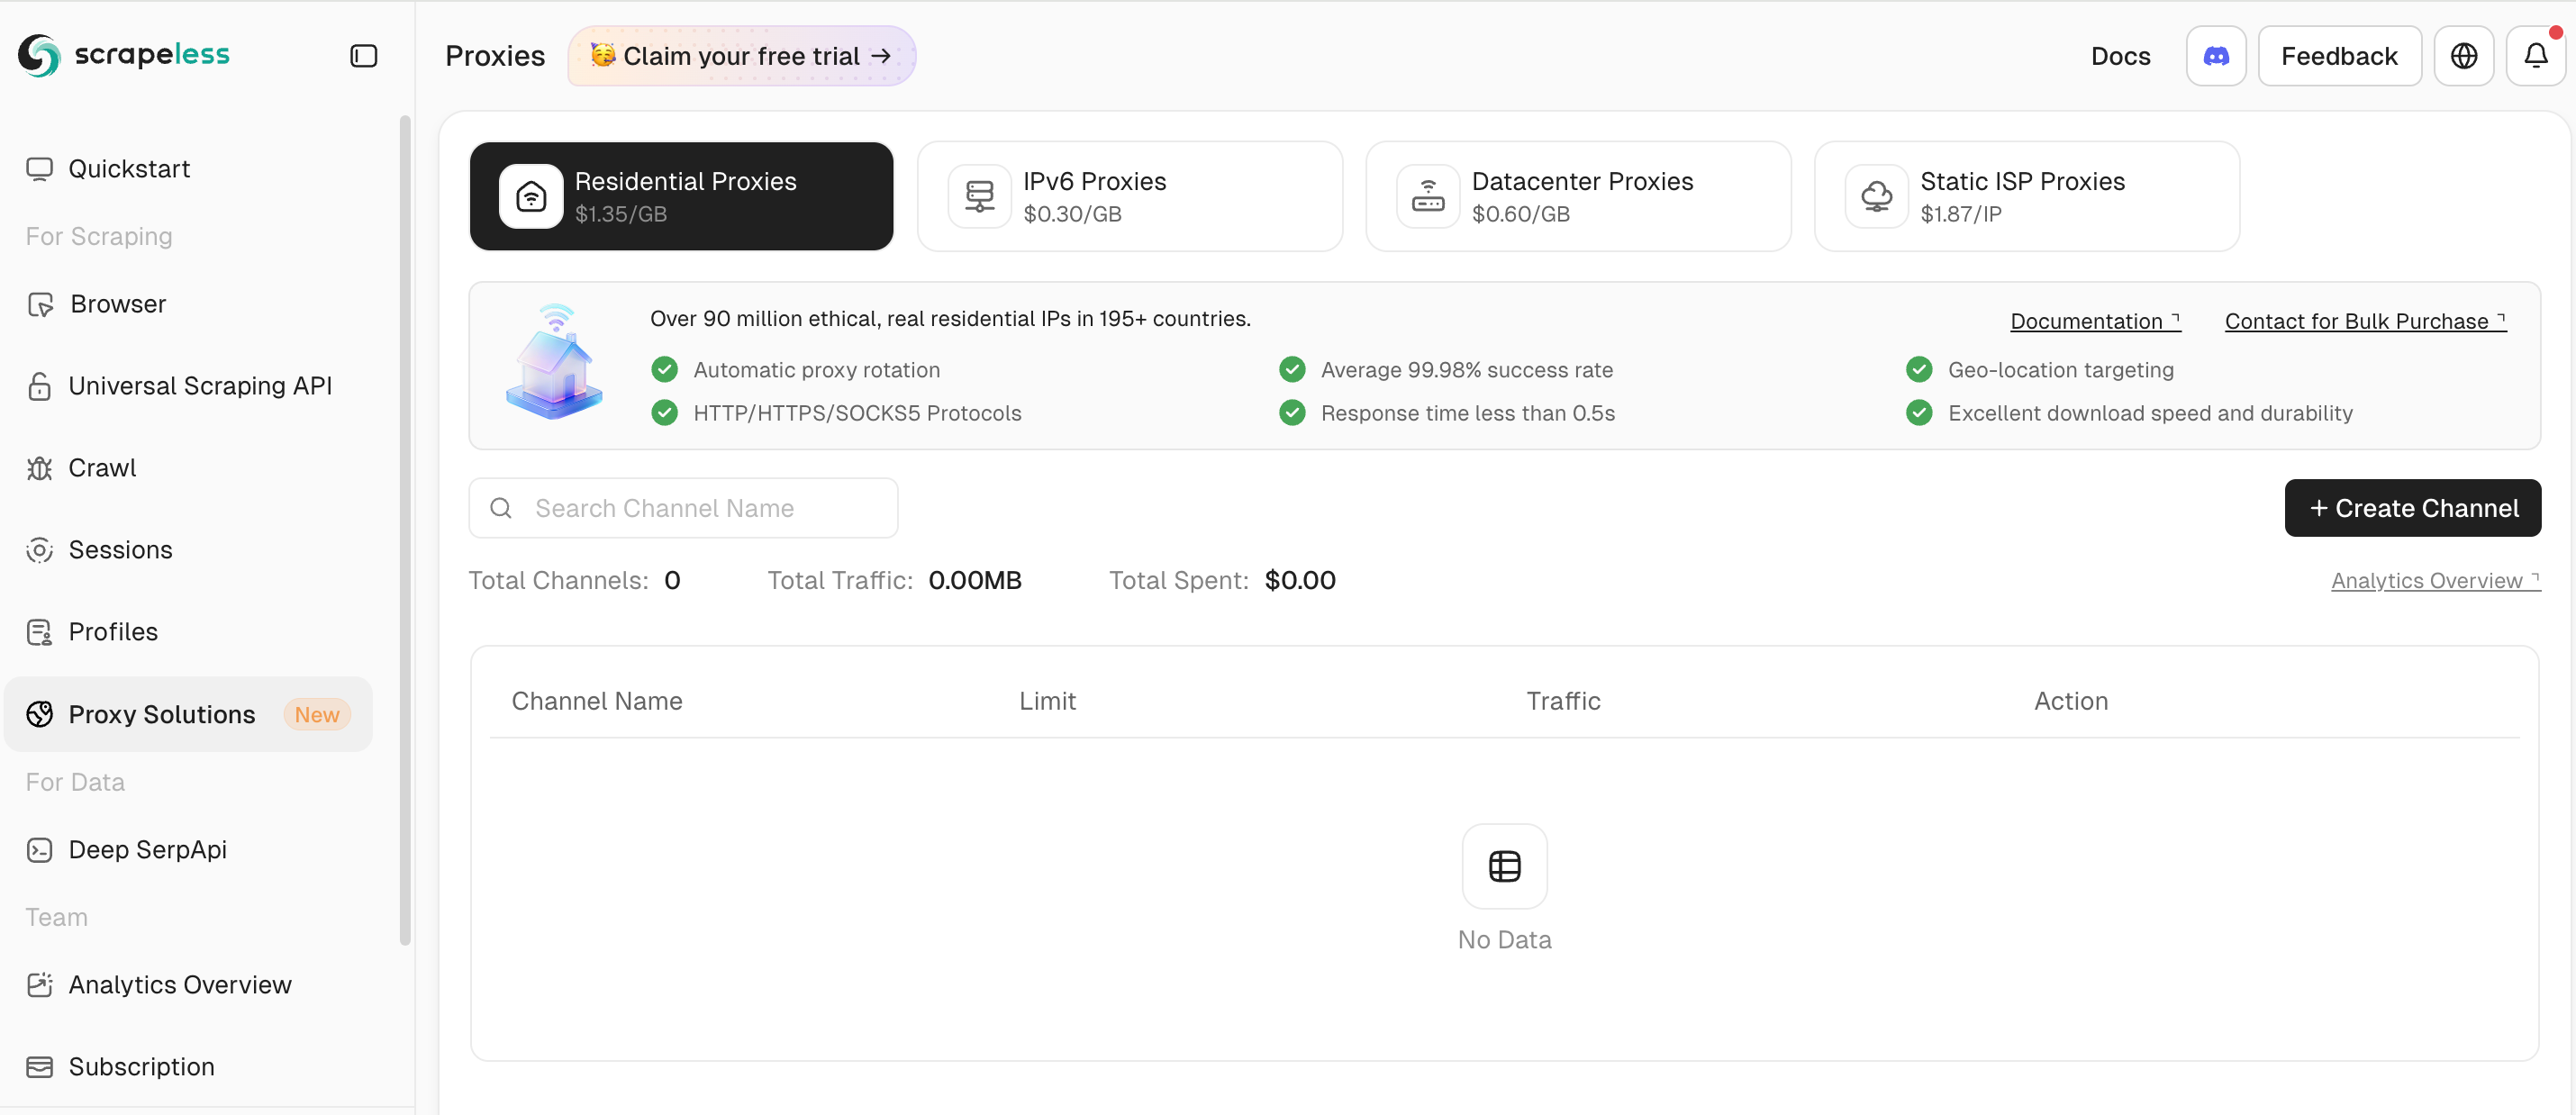
Create a Channel
-
In the left-hand panel, select Proxy Solutions, then choose IPv6 Proxy.
-
Click the Create Channel button to open the proxy creation page.
-
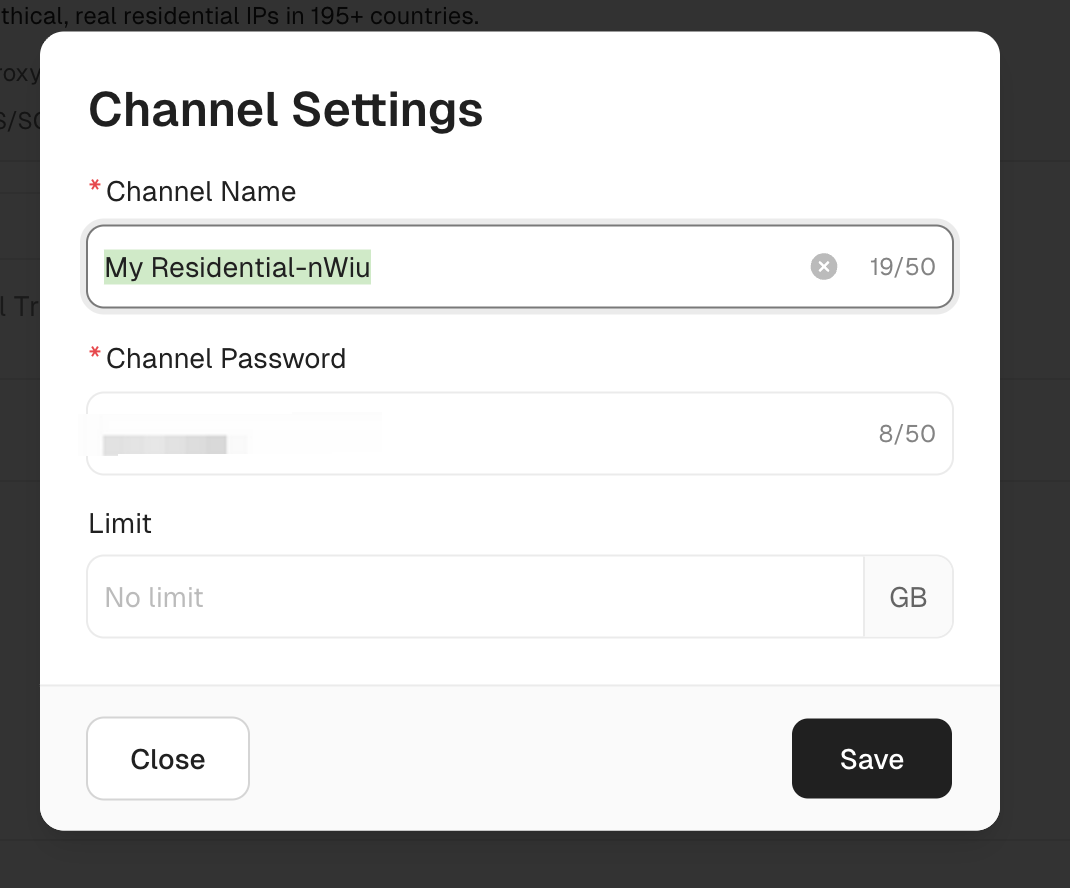
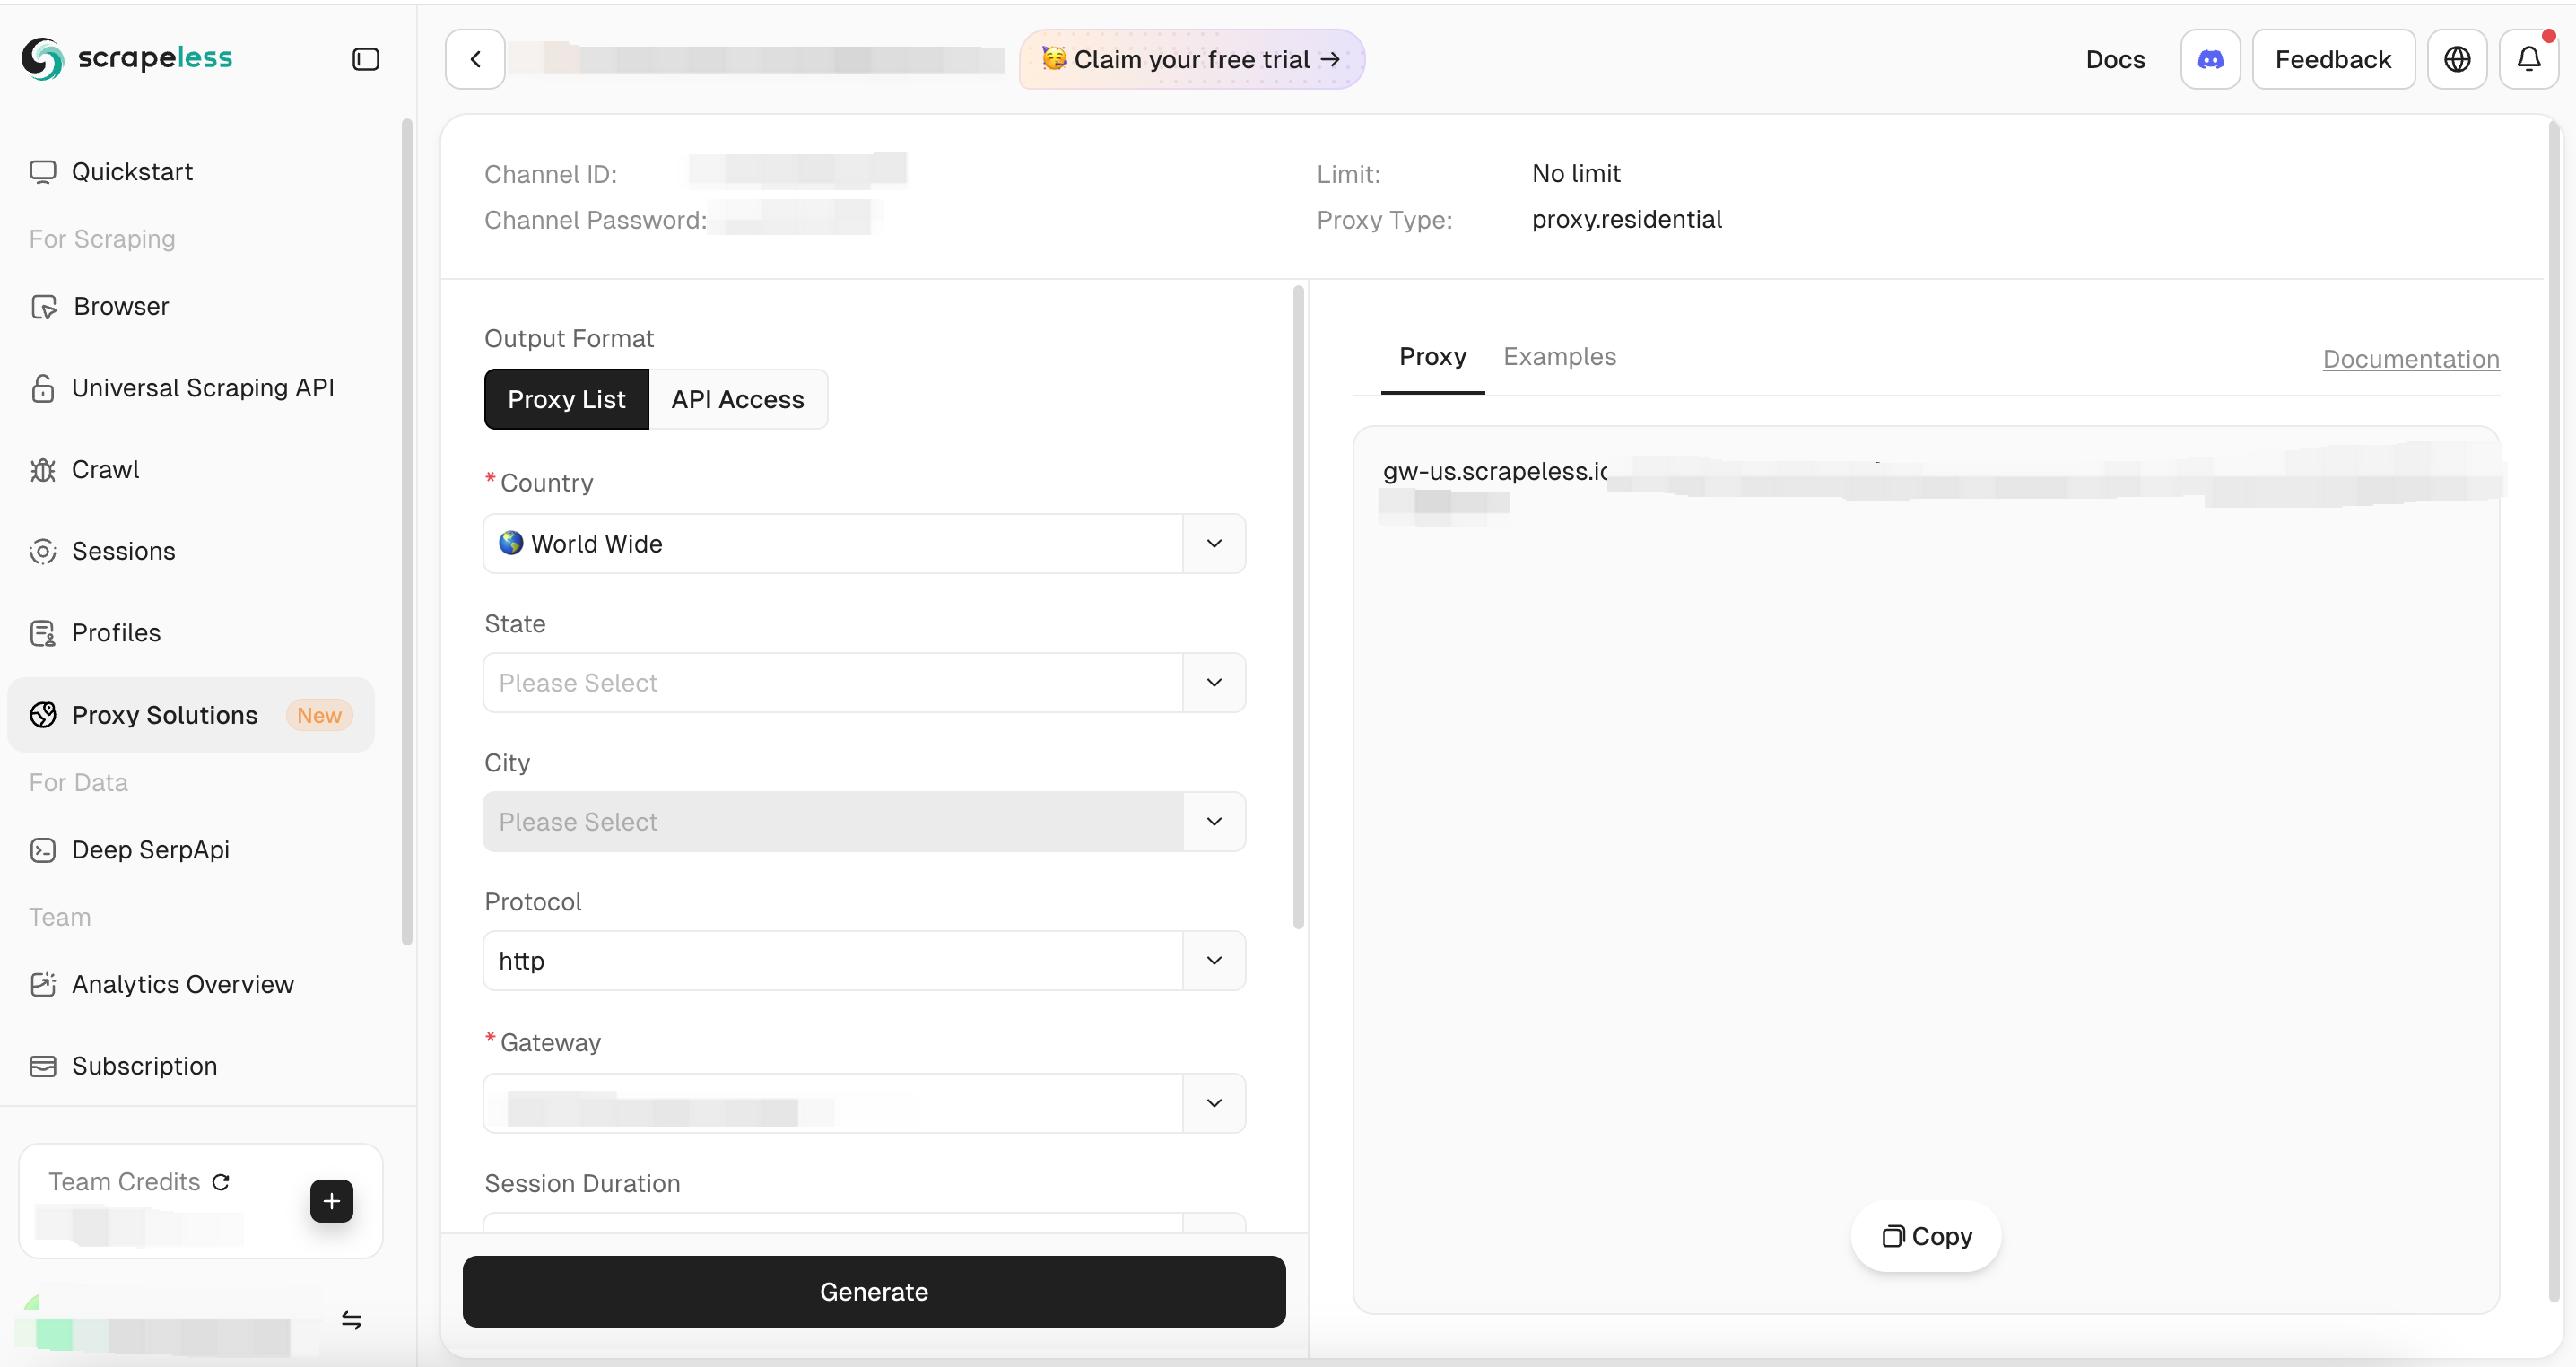
Set your password and limit, then click Save to complete the setup.
Use the Proxy
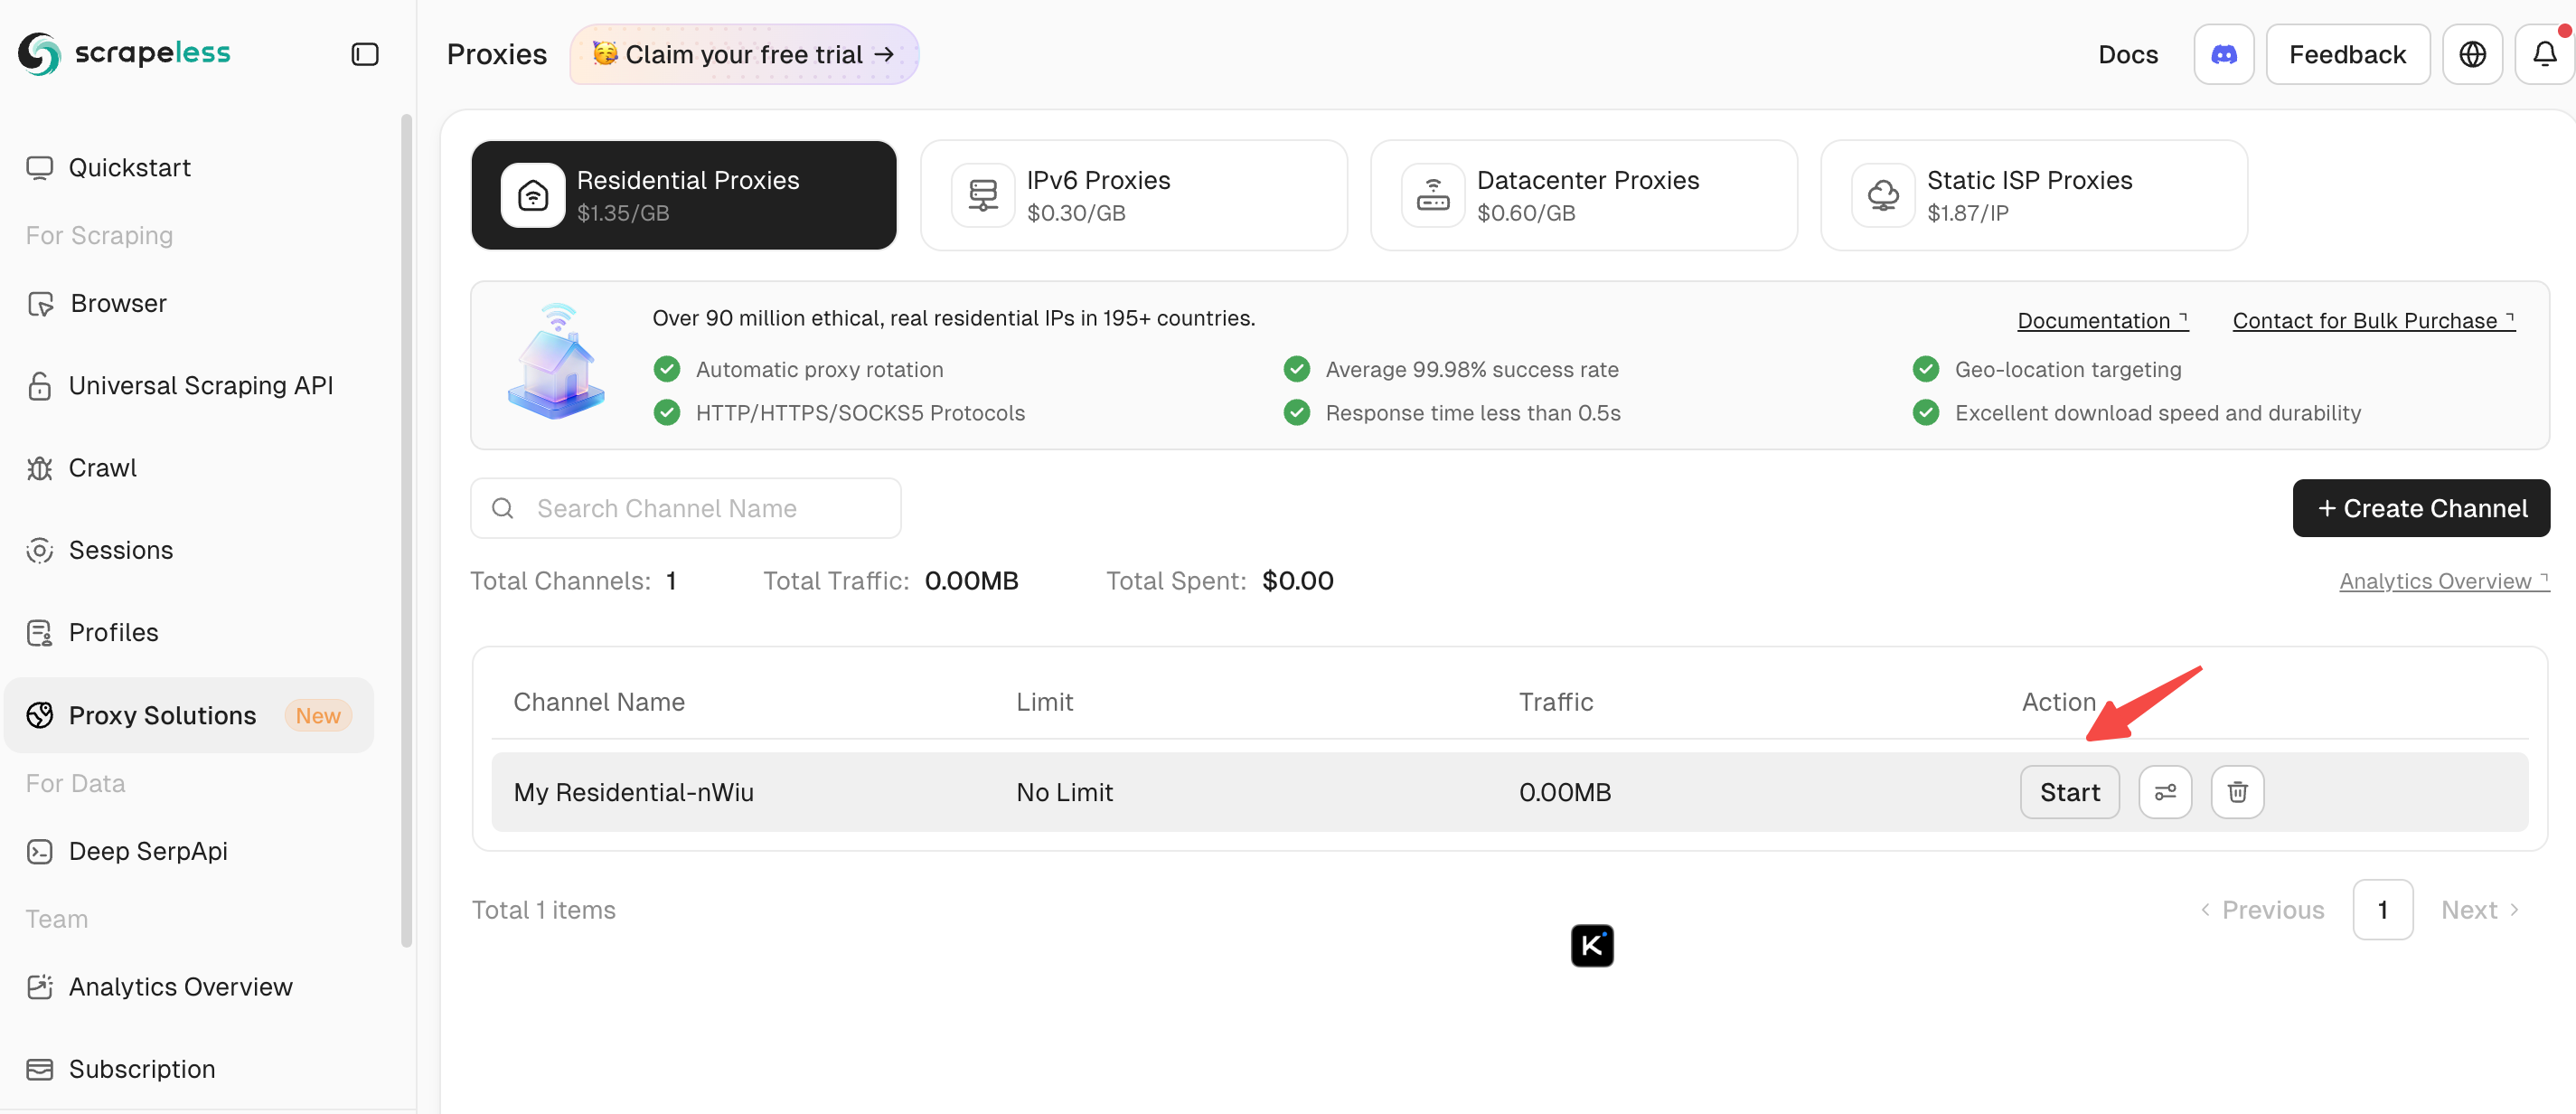
- In the Residential Proxy channel list, select a proxy channel and click Start.
- Click the Generate button to create a proxy or view an example.
10. Final Words
Tinyproxy is an excellent lightweight proxy solution for basic use, privacy, and small-scale automation. However, for advanced users, automation workflows, and high-volume scraping, we recommend Scrapeless Proxies.
At Scrapeless, we only access publicly available data while strictly complying with applicable laws, regulations, and website privacy policies. The content in this blog is for demonstration purposes only and does not involve any illegal or infringing activities. We make no guarantees and disclaim all liability for the use of information from this blog or third-party links. Before engaging in any scraping activities, consult your legal advisor and review the target website's terms of service or obtain the necessary permissions.