How to Scrape a Website Behind a Login With Python (2026)
Expert Network Defense Engineer
After years building scrapers, login walls remain one of the toughest challenges. This guide focuses on practical methods that work in real projects: from simple form logins to CSRF protection and sites guarded by modern WAFs and anti-bot systems. The examples are in Python where relevant, and I finish by showing how to use a remote browser (Scrapeless Browser) to handle the hardest protections.
This guide is for educational use only. Respect site terms of service and privacy rules (for example GDPR). Do not scrape content you are not allowed to access.
What this guide covers
- Scraping sites that require a simple username and password.
- Logging in to pages that require a CSRF token.
- Accessing content behind basic WAF protection.
- Handling advanced anti-bot protections using a remote browser (Scrapeless Browser) controlled via Puppeteer.
Can you scrape sites that require a login?
Yes — technically you can fetch pages behind a login. That said, legal and ethical limits apply. Social platforms and sites with personal data are especially sensitive. Always check the target site’s robots policy, terms of service, and applicable law.
Technically, the key steps are:
- Understand the login flow.
- Reproduce necessary requests (and tokens) programmatically.
- Persist authenticated state (cookies, sessions).
- Handle client-side checks when required.
1) Simple username + password logins (Requests + BeautifulSoup)
Conclusion up-front: If the login is a basic HTTP form, use a session and POST credentials.
Install the libraries:
bash
pip3 install requests beautifulsoup4Example script:
python
import requests
from bs4 import BeautifulSoup

login_url = "https://www.example.com/login"
payload = {
    "email": "admin@example.com",
    "password": "password",
}

with requests.Session() as session:
    r = session.post(login_url, data=payload)
    print("Status code:", r.status_code)
    soup = BeautifulSoup(r.text, "html.parser")
    print("Page title:", soup.title.string)
Notes:
- Use
Session()so cookies (session id) persist for subsequent requests. - Check response codes and body to confirm a successful login.
- If the site uses redirects,
requestsfollows them by default; inspectr.historyif needed.
2) CSRF-protected logins (get token, then post)
Conclusion up-front: Many sites require a CSRF token. First GET the login page, parse the token, then POST with the token.
Pattern:
- GET the login page.
- Parse the hidden token from the form.
- POST credentials + token using the same session.
Example:
python
import requests
from bs4 import BeautifulSoup

login_url = "https://www.example.com/login/csrf"

with requests.Session() as session:
    r = session.get(login_url)
    soup = BeautifulSoup(r.text, "html.parser")
    csrf_token = soup.find("input", {"name": "_token"})["value"]

    payload = {
        "_token": csrf_token,
        "email": "admin@example.com",
        "password": "password",
    }
    r2 = session.post(login_url, data=payload)
    soup2 = BeautifulSoup(r2.text, "html.parser")

    products = []
    for item in soup2.find_all(class_="product-item"):
        products.append({
            "Name": item.find(class_="product-name").text.strip(),
            "Price": item.find(class_="product-price").text.strip(),
        })

    print(products)
Tips:
- Some frameworks use different token names; inspect the form to find the correct input name.
- Send appropriate headers (User-Agent, Referer) to look like a normal browser.
3) Basic WAF / bot checks — use a headless browser when Requests fails
When headers and tokens are not enough, simulate a real browser with Selenium or a headless browser.
Selenium + Chrome can pass many basic protections because it executes JavaScript and runs a full browser environment. If you use Selenium, add realistic waits, mouse/keyboard actions and normal browser headers.
However, some WAFs detect automation via navigator.webdriver or other heuristics. Tools such as undetected-chromedriver help, but they are not guaranteed against advanced checks. Use them only for legitimate, permitted use.
4) Advanced anti-bot protections — use a remote real browser session (Scrapeless Browser)
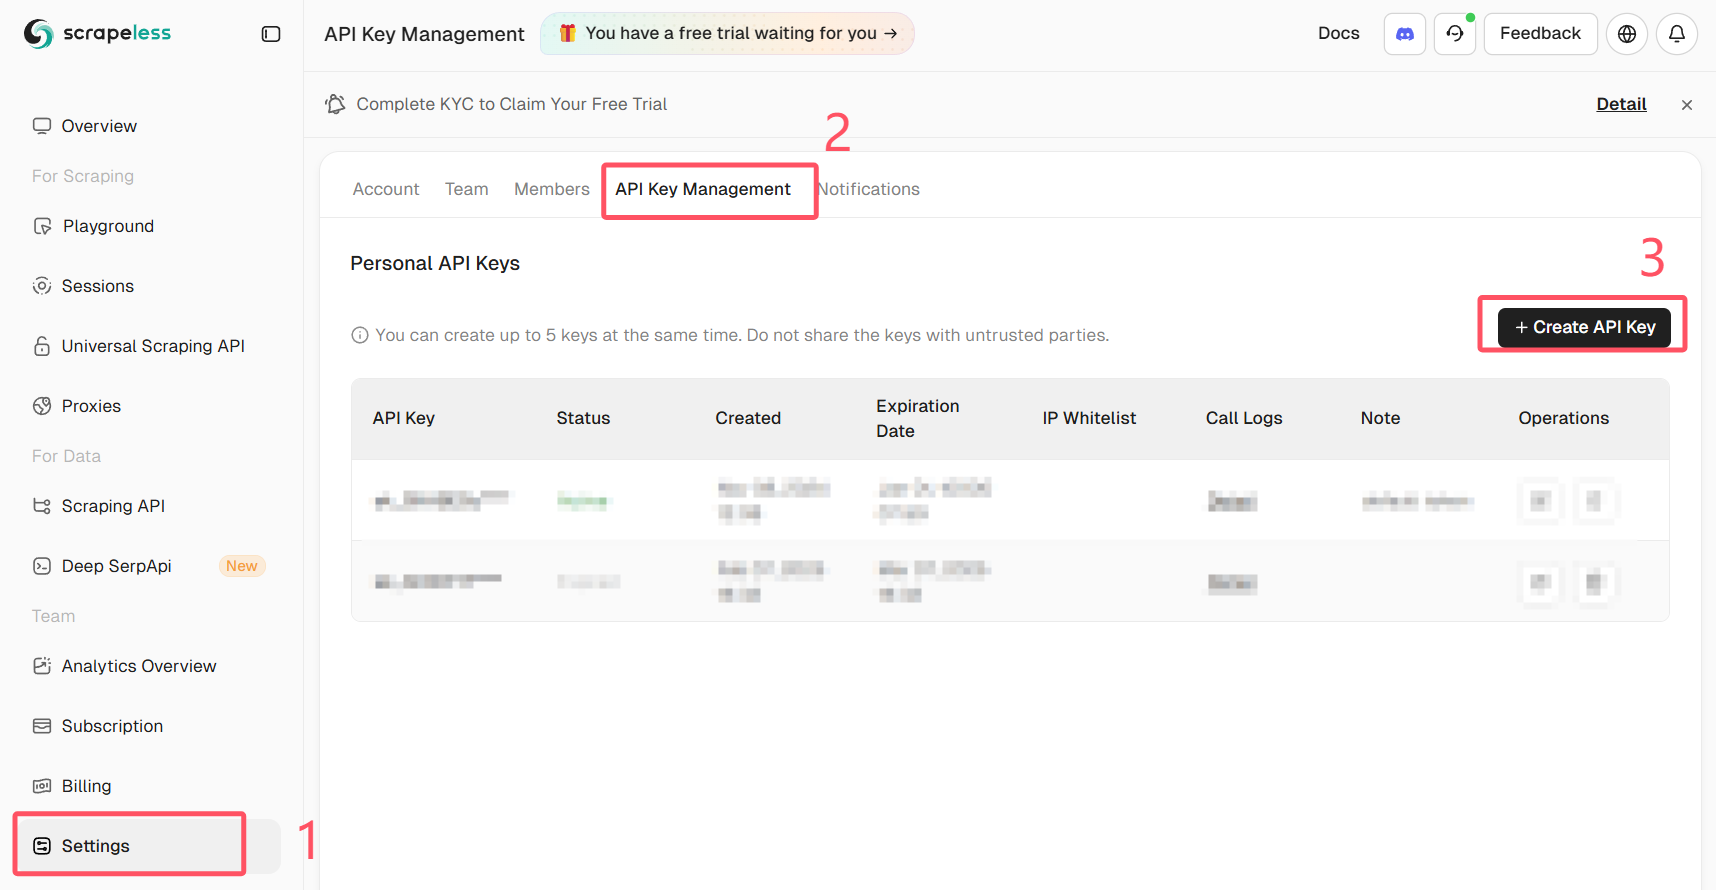
Get Your Scrapeless API Key
Log in to Scrapeless and get your API Key.
For the most robust approach, run a real browser remotely (not a local headless instance) and control it via Puppeteer. Scrapeless Browser provides a managed browser endpoint that reduces detection risk and offloads proxy/JS rendering complexity.
Why this helps:
- The browser runs in a managed environment that mimics real user sessions.
- JS executes exactly as in a real user browser, so client-side checks pass.
- You can record sessions and use proxy routing as needed.
Below is an example showing how to connect Puppeteer to Scrapeless Browser and perform an automatic login. The snippet uses puppeteer-core to connect to a Scrapeless WebSocket endpoint. Replace the token, your_email@example.com and your_password with your own values and never share credentials publicly.
Important: never commit real credentials or API tokens to public code. Store secrets securely (environment variables or a secret manager).
import puppeteer from "puppeteer-core"

// 💡Enabling "Use Playground Settings" will overwrite your playground code’s connection parameters.
const query = new URLSearchParams({
  token: "your-scrapeless-api-key",
  proxyCountry: "ANY",
  sessionRecording: true,
  sessionTTL: 900,
  sessionName: "Automatic Login",
})

const connectionURL = `wss://browser.scrapeless.com/api/v2/browser?${query.toString()}`

const browser = await puppeteer.connect({
  browserWSEndpoint: connectionURL,
  defaultViewport: null,
})

const page = await browser.newPage()
await page.goto("https://github.com/login")
await page.locator("input[name='login']").fill("your_email@example.com")
await page.locator("input[name='password']").fill("your_password")
await page.keyboard.press("Enter")
Notes on the sample:
- The example uses
puppeteer-coreto attach to a remote browser. Scrapeless exposes a WebSocket endpoint (browserWSEndpoint) that Puppeteer can use. - Session recording and proxy options are passed in query parameters. Adjust according to your Scrapeless plan and needs.
- Wait logic matters: use
waitUntil: "networkidle"or explicitwaitForSelectorto ensure the page has loaded fully. - Replace the placeholder token with a secure secret from your environment.
Practical tips and anti-block checklist
- Use the site’s API if one exists. It is safer and more stable.
- Avoid rapid parallel requests; throttle your scraper.
- Rotate IPs and session fingerprints when legitimate and necessary. Use reputable proxy providers.
- Use realistic headers and cookie handling.
- Check robots.txt and site terms. If the site disallows scraping, consider asking for permission or using official data feeds.
- Log the steps your scraper performs for easier debugging (requests, response codes, redirects).
Summary
You learned how to:
- Log in and scrape pages that accept simple username/password with
requests. - Extract and use CSRF tokens to authenticate securely.
- Use a browser automation tool when a site needs full JS rendering.
- Use a remote managed browser (Scrapeless Browser) via Puppeteer to bypass advanced client-side protections while keeping your own environment simple.
When protections are strong, a managed browser approach is often the most reliable route. Use it responsibly and keep credentials and API tokens secure.
At Scrapeless, we only access publicly available data while strictly complying with applicable laws, regulations, and website privacy policies. The content in this blog is for demonstration purposes only and does not involve any illegal or infringing activities. We make no guarantees and disclaim all liability for the use of information from this blog or third-party links. Before engaging in any scraping activities, consult your legal advisor and review the target website's terms of service or obtain the necessary permissions.