SSH to IPv6: Complete Guide to Secure Remote Connections
Expert Network Defense Engineer
Wondering how to SSH into a server using IPv6? Or how to configure your SSH client or server to accept IPv6 connections? This guide covers everything you need to know, from basic commands to advanced setups.
In short, on any UNIX-based system, you can connect to an IPv6 server using:
bash
ssh username@your_server_ipv6But there’s more to properly setting up SSH with IPv6 than just this command. Keep reading to get the full picture.
Table of Contents
- Setting Up SSH and IPv6 on Ubuntu
- Installing and Configuring SSH
- Connecting to Your Server via SSH
- Enabling and Configuring IPv6 on Ubuntu
- Security and Network Best Practices
- Common SSH Commands and IPv6 Management
- SSH on Other Systems (Cisco, Windows, macOS)
- Troubleshooting FAQ
- Final Thoughts
1. Setting Up SSH and IPv6 on Ubuntu
To set up SSH with IPv6 on Ubuntu, follow these steps to ensure secure, efficient remote access.
Step 1: Install the SSH Server
Update your package list:
bash
sudo apt updateInstall OpenSSH Server (if it’s already installed, Ubuntu will inform you):
bash
sudo apt install openssh-server
Check the SSH service status:
bash
sudo systemctl status ssh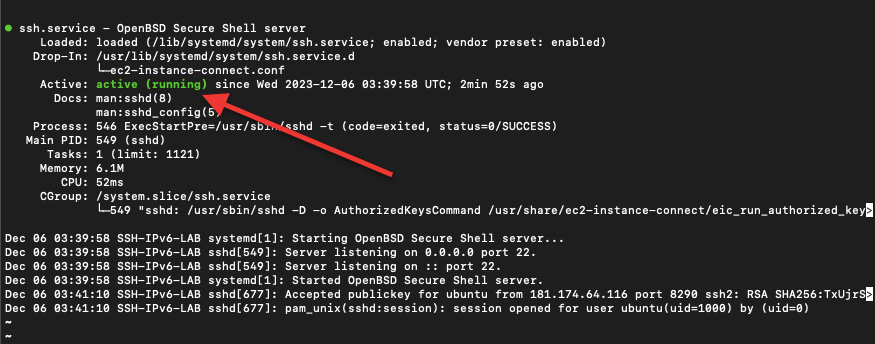
Step 2: Configure SSH (Optional)
Edit the main SSH configuration file (/etc/ssh/sshd_config) carefully:
bash
sudo cp /etc/ssh/sshd_config /etc/ssh/sshd_config.bak
sudo nano /etc/ssh/sshd_config
Recommended changes:
- Change default port (22) for security.
- Disable root login:
PermitRootLogin no - Restrict access to specific users:
AllowUsers username

Restart SSH to apply changes:
bash
sudo systemctl restart sshStep 3: Connect via SSH
From another device, connect using:
bash
ssh username@your_server_ipIf using a private key:
bash
ssh -i "private_key.pem" username@server_domainThe -i option specifies your private key for secure login.

2. Enabling and Configuring IPv6 on Ubuntu
IPv6 must be properly enabled and configured to work with SSH.
Step 1: Verify IPv6 Kernel Support
Check IPv6 status:
bash
cat /proc/sys/net/ipv6/conf/all/disable_ipv6- Returns
0: IPv6 is enabled. - Returns
1: IPv6 is disabled.

Enable IPv6 by editing /etc/sysctl.conf:
bash
sudo nano /etc/sysctl.confAdd:
net.ipv6.conf.all.disable_ipv6 = 0
net.ipv6.conf.default.disable_ipv6 = 0
Apply changes:
bash
sudo sysctl -pStep 2: Configure IPv6 Networking
Edit network configuration:
bash
sudo nano /etc/network/interfacesFor static IPv6:
iface eth0 inet6 static
address YOUR_IPV6_ADDRESS
netmask YOUR_IPV6_NETMASK
gateway YOUR_IPV6_GATEWAY
For DHCPv6:
iface eth0 inet6 dhcp
Restart networking:
bash
sudo systemctl restart networkingNote: On modern Ubuntu versions, netplan (
/etc/netplan/*.yaml) may handle network configuration instead.

Step 3: Security and Network Best Practices
- Keep your system updated:
sudo apt update && sudo apt upgrade - Use key-based authentication instead of passwords
- Enable a firewall (e.g., UFW)
- Monitor SSH logs (
/var/log/auth.log) - Disable unused services and ports
- Maintain regular backups
3. Common SSH Commands for IPv6
Basic SSH Commands
bash
ssh username@[ipv6_address]
scp /local/path username@[ipv6_address]:/remote/path
sftp username@[ipv6_address]
Advanced SSH Commands
- Generate SSH key:
ssh-keygen -t rsa - Copy key to server:
ssh-copy-id username@[ipv6_address] - Execute remote command:
ssh username@[ipv6_address] 'command' - Local port forwarding:
ssh -L local_port:destination_ip:remote_port username@[ipv6_address] - Remote port forwarding:
ssh -R remote_port:local_ip:local_port username@[ipv6_address]
You can also add your IPv6 server to
~/.ssh/configfor easier access.
4. SSH on Other Systems
Cisco Devices
- Enable IPv6:
ipv6 unicast-routing - Configure hostname, domain, and RSA keys
- Enable SSH version 2 and line vty access
- Connect using IPv6 from an SSH client
Windows and PowerShell
- Windows 10+ includes a native SSH client
- Use
ssh username@[IPv6_Address]in PowerShell or CMD - Third-party clients like PuTTY also support IPv6
- PowerShell can automate SSH connections and remote commands
macOS
- Terminal supports SSH IPv6 natively
- Use
~/.ssh/configto define IPv6 hosts and keys - Ensure network and firewall allow SSH traffic
5. Troubleshooting FAQ
- Cannot connect via IPv6? Verify addresses, firewall, and server listener.
- “Network unreachable”? Check IPv6 configuration and routing.
- SSH timeouts? Adjust
ServerAliveIntervaland network settings. - Port errors? Ensure correct IPv6 syntax:
ssh username@[2001:db8::1234]
6. Final Thoughts
This guide has shown how to set up SSH over IPv6 across Linux, Windows, macOS, and Cisco devices. By following these steps, you can securely connect to servers using IPv6 while maintaining a robust and future-proof network environment.
IPv6 adoption is increasing, and mastering SSH with IPv6 ensures your skills stay relevant for secure, scalable networking. Keep experimenting and learning — the sky’s the limit.
At Scrapeless, we only access publicly available data while strictly complying with applicable laws, regulations, and website privacy policies. The content in this blog is for demonstration purposes only and does not involve any illegal or infringing activities. We make no guarantees and disclaim all liability for the use of information from this blog or third-party links. Before engaging in any scraping activities, consult your legal advisor and review the target website's terms of service or obtain the necessary permissions.